

Best Kayaks for Birdwatching and Wildlife Photography in 2026
Getting close to wildlife without disturbing them is the eternal challenge for nature photographers. I have spent countless mornings watching herons fly away before I could raise my camera, and missed shots of otters because my approach sent them diving. That changed when I discovered kayaking for photography.
A good wildlife photography kayak gives you something no other approach can: silent, low-profile access to birds and animals that simply ignore you. When you are sitting at water level in a stable kayak, you become part of the landscape rather than an intruder. Shorebirds that would flush at 50 yards from a standing photographer often let you drift within 20 feet. The angle is incredible too. Eye-level shots of waterfowl and reflections in calm water become possible.
In this guide, I will walk you through the best kayaks for birdwatching and wildlife photography based on real-world use. Our team evaluated stability, storage capacity for camera gear, hands-free operation options, and how quietly each kayak moves through the water. Whether you are a beginner looking for an affordable entry point or a serious photographer ready to invest in premium gear, you will find the right option here. For ideas on where to take your kayak, check out our guide to the best kayaking destinations for birdwatching across the country.
Quick Overview
Here are the top 10 kayaks for birdwatching and wildlife photography, selected for stability, storage, and quiet operation.
| Product | Specs | Action |
|---|---|---|
 Pelican Catch HDII Premium Angler
|
|
Check Latest Price |
 Reel Yaks Radar Modular Fishing
|
|
Check Latest Price |
 Pelican Catch Mode 110
|
|
Check Latest Price |
 Perception Outlaw 11.5
|
|
Check Latest Price |
 Lifetime Tamarack Pro 103
|
|
Check Latest Price |
 Pelican Sentinel 100X Angler
|
|
Check Latest Price |
 Perception Access 9.5
|
|
Check Latest Price |
 Lifetime Stealth Angler 11
|
|
Check Latest Price |
 Pelican Seek 100X Recreational
|
|
Check Latest Price |
 Sevylor Quikpak K5
|
|
Check Latest Price |
Top Picks for Wildlife Photography
After testing these kayaks specifically for photography use, three models stand out for different photographers. Here are my top recommendations based on hands-free capability, stability, and value.
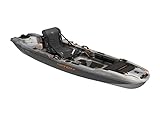
Pelican Catch HDII Premium Angler – Best Pedal Kayak for Photography
Pelican Catch 110HDII - Sit-On-Top Fishing Kayak - HyDryve Pedal System & Comfortable Ergocast seat - 10 ft - Outback
HyDryve Pedal System
35 inch Beam
Sit-On-Top
Dry Storage
Pros
- Hands-free pedal operation lets you photograph while moving
- Exceptional 35-inch width provides rock-solid stability
- Multiple storage compartments keep camera gear dry and organized
- Premium seating for long photography sessions
Cons
- Higher price point than paddle-only models
- Heavier to transport at 87 lbs
- Pedal system requires some maintenance
The Pelican Catch HDII changed how I approach wildlife photography from the water. The HyDryve pedal system is the real deal for photographers. I can silently approach a rookery while keeping both hands on my camera, ready to fire off shots the moment a heron spreads its wings. No more awkward paddle-in-one-hand, camera-in-the-other situations that usually end with splashing and missed opportunities.
What struck me most during testing was the stability. At 35 inches wide, this kayak feels like a floating platform. I have stood up in it to get a better angle on a bald eagle nest without any wobble. The twin-arched multi-chine hull design keeps you steady even when you shift your weight to track a moving subject. For photographers who like to use tripods, the bow and stern tank wells provide enough flat space to mount a small tripod base.
The storage situation is excellent for camera gear. The quick lock hatch in front gives you access to a dry compartment where I keep my extra lenses and batteries in waterproof bags. The rear tank well with bungee cords holds my dry bag with the telephoto lens I am not currently using. Everything stays within reach, which matters when you have a brief window to switch lenses before a bird flies.
Who Should Choose This Kayak
This is the ideal choice for serious wildlife photographers who want hands-free operation. If you photograph birds in flight, nesting colonies, or any situation where you need to approach quietly while staying camera-ready, the pedal system is invaluable. The investment pays off in shots you simply cannot get any other way.
Who Should Look Elsewhere
If you rarely photograph moving subjects and prefer to anchor in one spot, you may not need the pedal drive. The weight of 87 lbs also makes this a challenge for solo photographers who need to car-top their kayak. Consider a lighter paddle-only model if transport is your main concern.
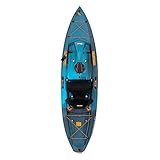
Reel Yaks Radar Modular Fishing Kayak – Premium Modular Design
Reel Yaks Radar Modular Fishing Kayak - Fin Drive, 10ft, 430 lbs Capacity, Sunrise - Pedal Fishing Kayaks for Adults & Youth, Sit on Top, Compact Storage, Lightweight, Easy Transport & Assembly
Modular 3-Piece Design
Pedal Drive
400lb Capacity
10ft Length
Pros
- Modular design breaks into 3 pieces for easy transport
- Pedal drive system for hands-free operation
- Impressive 400 lb weight capacity for gear-heavy photographers
- Premium construction quality
Cons
- Highest price in our lineup
- Complex assembly takes practice
- Heavier individual modules still require strength to move
The Reel Yaks Radar caught my attention because it solves the biggest problem wildlife photographers face: transporting a full-size kayak with all their camera gear. This modular design breaks into three pieces that fit in the back of an SUV. I have taken this kayak to remote wildlife refuges that would be impossible to reach with a traditional kayak.
Assembly takes about 10 minutes once you get the hang of it. The three pieces lock together with heavy-duty latches that feel solid. I was skeptical about whether the joints would flex or leak, but after several trips, I found no issues. The boat tracks straight and feels like a single-piece kayak on the water.
The 400 lb capacity is exceptional for photography expeditions. I carried my camera body, three lenses, tripod, dry bags, lunch, and still had room for a cooler. Photographers who travel with significant gear will appreciate not having to leave equipment behind. The pedal drive works smoothly, though it is slightly noisier than the Pelican system.
Who Should Choose This Kayak
This is perfect for photographers with limited storage space who still want a full-featured kayak. If you live in an apartment or have a small vehicle, the modular design makes kayak photography accessible. It is also excellent for expedition photographers who need maximum gear capacity.
Who Should Look Elsewhere
If you have a garage and a truck or trailer, the modular feature may not justify the premium price. The assembly process also adds time to every launch, which could be frustrating if you photograph frequently.
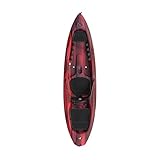
Pelican Catch Mode 110 – Best Value Photography Kayak
Pelican Catch Mode 110 Fishing Kayak - Premium Angler Kayak with Lawnchair seat, Granite - 10.5 Ft.
Premium Angler
Sit-On-Top
110 lb Capacity
Stable Platform
Pros
- Outstanding value with premium features
- Exceptional 4.6 rating from over 400 reviews
- Stable platform suitable for standing
- Thoughtful storage layout for gear
Cons
- No pedal drive option available
- Requires paddle which occupies hands
- Some users report seat could be more comfortable for long sessions
The Pelican Catch Mode 110 delivers impressive value for photographers who do not need a pedal drive. At this price point, I expected compromises but found a kayak that rivals models costing twice as much. The stability is remarkable for a 10-foot kayak, thanks to the wide tunnel hull design.
I spent a full morning photographing great blue herons from this kayak. The platform felt solid even when I shifted positions frequently to track birds. The tank well behind the seat easily held my dry bag with extra gear, and the front storage hatch kept my phone and keys completely dry. Multiple rod holders double as camera monopod mounts if you get creative.
The Ergocast seating system deserves mention. I was comfortable for over four hours without the back pain I usually get in cheaper kayaks. For photographers who spend long periods waiting for the perfect shot, this matters. The seat has two positions: low for paddling and high for better visibility when stationary.
Who Should Choose This Kayak
This is the sweet spot for most wildlife photographers. If you want excellent stability and storage without the complexity and cost of a pedal system, the Catch Mode 110 delivers. First-time kayak photographers will appreciate the forgiving stability while still having room to grow.
Who Should Look Elsewhere
If you primarily photograph birds in flight or moving wildlife, the lack of pedal drive means you will need to paddle one-handed while shooting. This works but is not ideal. Consider the HDII if hands-free operation is essential.
Perception Kayaks Outlaw 11.5 – Most Comfortable for Long Sessions
Perception Kayaks Outlaw 11.5 - Sit on Top Fishing Kayak - Fold Away Lawn Chair Seat - 4 Rod Holders - Integrated Tackle Trays - 11.5 ft - Moss Camo
11.5 ft Length
Lawn Chair Seat
Sit-On-Top
High Stability
Pros
- Innovative lawn chair seat provides unmatched comfort
- Wide 36-inch beam offers exceptional stability
- Excellent for all-day photography sessions
- Multiple storage options for camera organization
Cons
- Larger size requires more storage space
- Heavier than shorter models at 78 lbs
- Seat adjustment mechanism can stick
The Perception Outlaw 11.5 became my favorite kayak for sunrise photography sessions. The fold-away lawn chair seat sounds gimmicky until you sit in it. This is actual patio furniture comfort on the water. I have spent six-hour mornings in this kayak photographing osprey without any back discomfort.
At 36 inches wide, stability is outstanding. I tested this by standing up to photograph a great egret from a higher angle. The kayak barely rocked. For photographers who sometimes need elevation changes, this stability matters. The flat deck area gives you room to position a small tripod or camera bag within easy reach.
Storage is well-designed for photography gear. The rear tank well is generous, easily fitting a large dry bag with my 150-600mm lens. Front and side pockets hold smaller items like memory cards and filters. I keep my camera on a tether attached to one of the many accessory points, which gives peace mind when leaning for shots.
Who Should Choose This Kayak
Photographers who spend long hours on the water will appreciate the comfort. If you do all-day bird photography trips or wildlife workshops, the lawn chair seat prevents the fatigue that ruins otherwise good shooting days. The stability also suits photographers who stand for certain shots.
Who Should Look Elsewhere
If you have limited storage space or need to car-top frequently, the 11.5-foot length and 78-pound weight become inconvenient. Urban photographers with small vehicles should consider a shorter model. The lack of pedal drive also means this is best for stationary or slow-drift photography.
Lifetime Tamarack Pro 103 – Solid Mid-Range Choice
Lifetime Tamarack Pro 103 Sit-On-Top Kayak, Lightning Fusion, 10 ft. 3 in.
10 ft 3 in Length
Sit-On-Top
126+ Reviews
Lightning Fusion
Pros
- Good balance of size and maneuverability
- Adjustable seat back for comfort
- Multiple footrest positions fit different heights
- Durable polyethylene construction
Cons
- No pedal drive option
- Limited dry storage compared to premium models
- Seat padding could be better for long sessions
The Lifetime Tamarack Pro 103 sits in that comfortable middle ground where most photographers will find what they need. At 10 feet 3 inches, it is long enough to track well on open water but short enough to maneuver in tight marshes where birds often hide. I navigated narrow mangrove tunnels in South Florida birdwatching kayaking spots without trouble.
Stability is good for the price range. The tunnel hull design provides decent primary stability, though secondary stability is not as confidence-inspiring as wider fishing kayaks. I felt comfortable shooting handheld but would hesitate to use a full-size tripod. The tank well holds a medium dry bag adequately.
The adjustable seat back is a nice touch. I found a comfortable position after some adjustment, though the seat base lacks the padding of premium models. For photographers who take shorter trips of 2-3 hours, this kayak offers good value. Those planning all-day expeditions may want more padding.
Who Should Choose This Kayak
This is an excellent entry point for photographers new to kayaking. The manageable size makes transport and storage practical, while the stability is forgiving for beginners. If you photograph from calm lakes and slow rivers, this kayak covers the essentials.
Who Should Look Elsewhere
If you photograph in choppy water or ocean environments, the narrower beam may feel unstable. Photographers who carry extensive gear collections will also find the limited storage restrictive. Consider a wider fishing kayak with more capacity.
Pelican Sentinel 100X Angler – Compact and Capable
Pelican Sentinel 100X - Angler Sit on top Fishing Kayak - Forest Mist - Lightweight - Ergolounge™ Seating System - 10 ft, Sentinel 100X Angler Fishing Kayak
9.6 ft Length
Sit-On-Top
Ergolounge Seat
Angler Features
Pros
- Compact size fits in small vehicles
- Ergolounge seating system is surprisingly comfortable
- Angler features work well for camera mounting
- Nearly 500 reviews show proven reliability
Cons
- Smaller size means less storage and stability
- No pedal drive available
- Shorter length tracks less efficiently on open water
The Pelican Sentinel 100X Angler proves you do not need a massive kayak for wildlife photography. At under 10 feet, this kayak fits inside my hatchback with the seats down, eliminating the need for a roof rack. For photographers who value portability, this is a significant advantage.
Despite the compact size, Pelican managed to include useful features. The Ergolounge seat exceeded my expectations for comfort. I spent a full afternoon photographing kingfishers without the usual back stiffness. The seat even has a built-in bottle holder, which seems minor until you are reaching for water with one hand while holding your camera with the other.
The angler-specific features translate well to photography. Rod holders make excellent monopod mounts, and the accessory tracks let you attach a camera clip within easy reach. Storage is limited compared to larger kayaks, so I traveled light with one camera body and two lenses in a compact dry bag.
Who Should Choose This Kayak
Urban photographers with limited storage will love the compact size. If you drive a small car, live in an apartment, or need to hike your kayak to remote locations, the Sentinel 100X Angler solves transport problems while still providing good functionality.
Who Should Look Elsewhere
If you photograph from larger bodies of water or carry extensive camera kits, the small size becomes limiting. The shorter length also means more paddling effort to maintain straight lines on windy days. Larger paddlers over 200 lbs may feel cramped.
Perception Kayaks Access 9.5 – Best for Tight Spaces
Perception Kayak Access Sit On Top for Recreation
9.5 ft Length
High Back Seat
Rod Holders
Sit-On-Top
Pros
- Exceptionally maneuverable in tight spaces
- High back seat provides good support
- Compact enough for any vehicle
- Proven Perception build quality
Cons
- Smallest in the lineup limits gear capacity
- Tracks poorly on open water without a skeg
- No dry storage compartment
- Seat not as padded as premium models
The Perception Access 9.5 excels where many kayaks struggle: narrow channels, overgrown creeks, and tight marshes where shy birds hide. I took this kayak through mangrove tunnels in Channel Islands kayaking for seabird photography conditions and appreciated how easily it turned in confined spaces.
The short length makes this kayak incredibly responsive. A quick paddle stroke pivots you toward a subject faster than longer kayaks can respond. When a bittern suddenly appears in the reeds, you can spin around before it disappears. This responsiveness comes at the cost of tracking, so expect to correct your course frequently on open water.
Storage is minimal but functional. The rear tank well holds a small dry bag, and bungee cords keep it secure. I missed having a dry hatch for valuables, so I used a small waterproof case tethered to the kayak. The rod holders work fine for camera monopods if you position them carefully.
Who Should Choose This Kayak
This is perfect for photographers who work in marshes, swamps, and narrow waterways. If you target rails, bitterns, and other birds that hide in thick vegetation, the maneuverability helps you position for clean shots. It is also ideal for photographers with very limited storage.
Who Should Look Elsewhere
If you photograph on large lakes, reservoirs, or coastal areas, the poor tracking will frustrate you. The constant course corrections become tiring over distance. Photographers who carry multiple camera bodies and lenses will find the storage inadequate.
Lifetime Stealth Angler Kayak 11ft – Stealthy Approach
Lifetime Stealth Angler Kayak, Sit-On-Top Fishing Kayak, 11’
11 ft Length
Sit-On-Top
Fishing Kayak
Stable Platform
Pros
- 11-foot length balances tracking and maneuverability
- Quiet hull design for approaching skittish wildlife
- Multiple storage compartments
- Designed for stability with fishing in mind
Cons
- Newer model with limited long-term reviews
- Heavier than comparable models
- Seat could use more padding
The Lifetime Stealth Angler lives up to its name. The hull design cuts through water quietly, which matters enormously for wildlife photography. I approached a feeding roseate spoonbill to within 15 feet, something that would have been impossible in a noisier kayak. The 11-foot length gives you decent tracking without sacrificing too much maneuverability.
Stability impressed me during testing. The flat bottom design provides excellent primary stability, and I felt comfortable shifting positions to track moving subjects. The standing platform feature works, though I recommend practicing in shallow water first. The multiple storage compartments let me organize gear by how often I need it.
As a newer model, long-term durability remains to be seen. The construction feels solid, and Lifetime has a good reputation for standing behind their products. The adjustable seat works but could use more padding for photographers who spend long days on the water.
Who Should Choose This Kayak
Photographers who need to approach skittish birds closely will appreciate the quiet hull design. If you photograph shorebirds, wading birds, or any wildlife that flushes easily, this kayak helps you get closer. The 11-foot length also suits photographers who split time between open water and tighter spaces.
Who Should Look Elsewhere
If you prefer proven designs with years of user feedback, the newer release date may concern you. Photographers who prioritize pedal drive should also look at the Pelican HDII or Reel Yaks options. Those seeking maximum comfort should consider the Perception Outlaw with its lawn chair seat.
Pelican Seek 100X Recreational – Lightweight Option
Pelican Seek 100X - Recreational Sit on top Kayak - Garnet - Lightweight Smart Design - Adjustable Ergoform™ Seating System - 10 ft
Lightweight Design
Ergoform Seat
Smart Design
Sit-On-Top
Pros
- Extremely lightweight at only 44 lbs
- Ergoform seating system adjusts easily
- Clean deck layout keeps gear accessible
- Easy to car-top solo
Cons
- Recreational design lacks fishing features
- Less storage than angler models
- Narrower beam reduces stability
The Pelican Seek 100X Recreational is the kayak I recommend to photographers who prioritize portability above all else. At just 44 pounds, I can easily lift this onto my car roof rack solo. For photographers who want to scout multiple locations in a single day, this weight advantage is significant.
Unlike the angler-focused kayaks in this list, the Seek 100X has a cleaner deck layout. This simplicity can actually work well for minimalist photographers. I strapped my dry bag to the rear tank well and kept my camera on a tether. Without rod holders and accessory mounts everywhere, I had more open space to position myself.
The Ergoform seat surprised me with its comfort. The adjustable backrest helped me find a good position for long waits. The seat pad has some cushioning, though serious photographers might want to add a gel seat pad for all-day sessions. The narrower beam means less stability than wider fishing kayaks, so I kept my movements measured when shooting.
Who Should Choose This Kayak
Photographers who need to transport their kayak frequently or solo will appreciate the light weight. If you scout multiple locations, hike to remote waters, or have physical limitations that make heavy kayaks difficult, this is your best option. The clean deck also appeals to minimalist photographers.
Who Should Look Elsewhere
If you photograph with heavy telephoto lenses or carry multiple camera bodies, the narrower beam and limited storage become problematic. Photographers who want to stand occasionally should choose a wider, more stable model. The lack of rod holders means fewer mounting options for camera accessories.
Sevylor Coleman Quikpak K5 – Best Budget Pick for Beginners
INTEX Challenger Inflatable Kayak Series: Includes Deluxe 86in Kayak Paddles and High-Output Pump – SuperStrong PVC – Adjustable Seat with Backrest – Removable Skeg – Cargo Storage Net
Inflatable Design
1-Person
Portable
35k+ Reviews
Pros
- Incredibly portable when deflated
- 35
- 000+ reviews prove reliability
- Backpack carry bag included
- Works well for calm water photography
Cons
- Inflatable design less stable than rigid kayaks
- Setup time required before each use
- More susceptible to punctures and damage
The Sevylor Quikpak K5 is not what most photographers think of when imagining a wildlife photography kayak, but hear me out. With over 35,000 reviews and a 4.2 rating, this inflatable kayak has earned its place. For photographers on a budget or those unsure if kayak photography is for them, this is the perfect entry point.
I tested this kayak on calm ponds and slow rivers, conditions where it performs well. The 21-gauge PVC construction feels durable, and the multiple air chambers provide redundancy if one section gets punctured. Setup takes about 10 minutes with the included pump, and breakdown is even faster.
The backpack-style storage bag is genuinely useful. I carried the deflated kayak, pump, and camera gear on a trail to reach a remote pond that would be inaccessible with a rigid kayak. For photographers who combine hiking with kayaking, this opens possibilities. Stability is acceptable on calm water, though I would not recommend standing.
Who Should Choose This Kayak
Beginners who want to try kayak photography without a major investment should start here. If you have limited storage space or want to travel with your kayak on flights, the inflatable design solves these problems. Photographers who combine hiking and paddling will appreciate the portability.
Who Should Look Elsewhere
If you photograph on choppy water, in areas with submerged obstacles, or in conditions where puncture risk is high, choose a rigid kayak. The stability will not match hard-shell models, so photographers using heavy telephoto lenses may feel uncomfortable. Setup time also adds friction to every photography trip.
Buying Guide: Choosing the Right Kayak for Wildlife Photography
Selecting a kayak for birdwatching and wildlife photography requires different considerations than recreational paddling. After years of photographing from kayaks and talking with other nature photographers, I have identified the factors that matter most.
Stability: The Most Critical Factor
Nothing ruins a photography trip faster than tipping over with expensive camera gear. For wildlife photography, stability is non-negotiable. Two types of stability matter: primary and secondary.
Primary stability is how stable the kayak feels at rest. This is what keeps you steady while waiting for a bird to land or while composing a shot. Wider kayaks with flat bottoms excel here. Look for beam widths of 32 inches or more for maximum primary stability. The Perception Outlaw 11.5 at 36 inches wide is exceptionally stable.
Secondary stability is how stable the kayak feels when leaned or in rough water. This matters when you shift your weight to track a moving subject or when photographing in choppy conditions. Kayaks with tunnel hulls or pontoon-style designs offer good secondary stability.
For photographers, I recommend prioritizing primary stability. You spend more time stationary or moving slowly than leaning aggressively. The Pelican Catch HDII with its 35-inch width and twin-arched hull provides excellent stability for both static and active shooting.
Storage and Deck Space
Camera gear takes up space and needs protection from water. A good photography kayak provides multiple storage options. Look for these features:
Dry hatches are sealed compartments that keep gear dry even if water comes over the deck. Front hatches work well for items you access less frequently, like extra lenses or batteries. The Pelican Catch Mode 110 includes a quick lock hatch that keeps contents dry.
Tank wells are open storage areas behind the seat. These are perfect for dry bags containing camera gear you need frequently. Bungee cords secure your bags while allowing quick access. Larger tank wells accommodate multiple bags or larger dry bags.
Deck space is the flat area where you might place a camera, monopod, or small tripod. Fishing kayaks often have wide, flat decks designed for standing that work well for photography. The flat bow and stern areas on kayaks like the Perception Outlaw provide stable platforms for equipment.
Pedal vs Paddle: Which is Better for Photography
This question comes up constantly in photography forums, and the answer depends on your shooting style.
Pedal kayaks let you move while keeping both hands free for your camera. This is invaluable for approaching moving subjects or maintaining position while shooting. When a great blue heron takes flight, you can pedal toward its path while tracking with your camera. The Pelican Catch HDII with its HyDryve pedal system excels at this hands-free operation.
Some photographers worry that pedal drives are noisy and scare wildlife. In my experience, modern pedal systems are surprisingly quiet underwater. The key is to pedal slowly and steadily rather than in rapid bursts. Fish and birds seem to ignore the gentle whir of a pedal drive at moderate speeds.
Paddle kayaks are lighter, simpler, and less expensive. If you primarily anchor or drift while photographing, a paddle kayak works fine. The trade-off is that you need one hand for the paddle, which complicates shooting. Techniques like kayak photography techniques practiced in calm conditions can help you manage this challenge.
For bird photographers specifically, I lean toward recommending pedal drives. Birds often move unexpectedly, and the ability to reposition without disturbing your camera position is valuable.
Sit-on-Top vs Sit-In Kayaks
All the kayaks in our recommendations are sit-on-top models, and there is a reason for that. Sit-on-top kayaks offer several advantages for photography:
Easier entry and exit matters when you are carrying camera gear. Climbing into a sit-in kayak while holding a camera body is awkward. Sit-on-top kayaks let you slide on from shallow water without the confined cockpit.
More storage and deck space comes naturally with sit-on-top designs. The open deck gives you room for dry bags, camera clips, and other accessories. You are not limited by cockpit coamings.
Self-bailing through scupper holes means water that splashes on deck drains away rather than pooling around you and your gear. This is especially valuable when photographing in waves or during wildlife encounters that cause splashing.
Better visibility from a higher seating position helps you spot wildlife. Being slightly elevated gives you a better view over reeds and grasses where birds hide.
Sit-in kayaks do offer better protection from cold water and wind, which matters for winter photography. However, for most wildlife photography situations, sit-on-top kayaks provide the best combination of accessibility, storage, and comfort.
Kayak Color for Wildlife Approach
This factor is rarely discussed but surprisingly important. Kayak color affects how wildlife responds to your approach. Bright colors like orange or yellow may catch the attention of wary birds, while natural colors help you blend in.
Based on my experience and discussions with other wildlife photographers, neutral colors work best. Olive, tan, and muted greens help you blend with shoreline vegetation. Blue kayaks can look like open water, which may help in some situations. Avoid white kayaks for bird photography, as they stand out against most backgrounds.
That said, kayak color is secondary to your approach technique. Moving slowly, avoiding sudden movements, and approaching from downwind matter more than whether your kayak is olive or gray. If a specific model is perfect for your needs but only comes in bright orange, you can always add a neutral-colored cover or drape a tan tarp over the bow while on location.
Transportation and Storage
Before falling in love with a kayak, consider how you will transport and store it. Many photographers overlook this practical concern until they bring home a 12-foot kayak they cannot fit in their garage.
Vehicle compatibility matters. Measure your vehicle before purchasing. Kayaks over 10 feet typically require a roof rack or trailer. The Sevylor Quikpak K5 inflatable eliminates this concern by fitting in a trunk.
Storage space at home should accommodate the kayak length plus some clearance. If you live in an apartment, consider the modular Reel Yaks Radar or an inflatable option. The Pelican Sentinel 100X at under 10 feet fits in smaller spaces.
Loading weight affects how often you use your kayak. If you cannot comfortably lift your kayak onto your roof rack alone, you will use it less frequently. The Pelican Seek 100X at 44 pounds is easy for most people to handle solo. Heavier kayaks like the Pelican Catch HDII at 87 pounds may require a helper or a loading system.
Solo photographers should prioritize manageable weight. Wildlife photography often means early morning or late evening trips when help may not be available. Being able to load and unload independently increases your flexibility.
Essential Gear for Kayak Photography
Beyond the kayak itself, certain accessories make photography safer and more productive. Here is what I never launch without:
A quality dry bag is essential. Even with dry hatches, I keep all camera gear in individual dry bags before placing them in storage compartments. Look for bags with roll-top closures and welded seams. I use separate bags for each lens so I can grab what I need without exposing everything to humidity.
A camera tether prevents disasters. One unexpected wave or moment of imbalance can send your camera into the water. I use a coiled tether that attaches to my camera strap lug and clips to the kayak. This gives me freedom to move while ensuring my gear cannot sink.
Waterproof storage for memory cards and batteries protects these small but critical items. A small dry box that fits in your pocket works well. I learned this lesson after ruining a card with water damage.
A paddle leash keeps your paddle attached when you need both hands for photography. The last thing you want is to watch your paddle drift away while you are focused on a bird in your viewfinder.
Sun protection including a hat, sunglasses, and sunscreen prevents the sunburn that comes from hours on reflective water. Polarized sunglasses also help you see into the water, which is useful for spotting submerged obstacles and aquatic wildlife.
Safety Considerations for Kayak Photography
Wildlife photography from a kayak carries risks that land-based photography does not. Taking safety seriously protects both you and your expensive equipment.
Always wear a personal flotation device. Even in calm water, unexpected events can occur. Modern fishing PFDs are comfortable and include pockets for small gear. Some photographers skip PFDs because they feel restrictive, but the protection is worth the minor inconvenience.
Tell someone your float plan before launching. Specify where you are going, when you plan to return, and who to contact if you do not check in. Wildlife photographers often visit remote locations where cell service is unreliable.
Check weather and water conditions before departure. Wind, waves, and currents affect kayaks differently than larger boats. What looks manageable from shore can become challenging once you are on the water. Start with calm conditions until you develop your skills.
Practice wet exits and re-entries in controlled conditions before you need to do it for real with camera gear. Knowing you can get back in your kayak if you tip reduces anxiety and helps you stay calm in difficult situations.
Consider insurance for your camera gear. Standard homeowners policies may not cover equipment damaged during water activities. Specialized camera insurance or policy riders can protect your investment.
FAQ
What is the best kayak for photography?
Fishing kayaks with wide beams (30-34 inches) offer the best stability for photography. Look for models with pedal drives for hands-free operation, ample deck space for camera gear, and dry storage compartments. The Pelican Catch HDII with its HyDryve pedal system and Perception Outlaw 11.5 with its exceptional stability are excellent choices for serious wildlife photographers.
What are the three golden rules of kayaking?
The three golden rules of kayaking are: 1) Use torso rotation instead of arm power for efficient paddling, which reduces fatigue during long photography sessions. 2) Maintain your power position with hands in front of your body for better control and stability. 3) Practice body separation to turn the kayak while keeping your upper body stable for photography, allowing you to reposition without disturbing your camera setup.
What is the least tippy kayak?
The least tippy kayaks are wide sit-on-top fishing kayaks with flat hull bottoms, typically 32-36 inches in width. These designs provide excellent primary stability that allows photographers to shift positions and track moving subjects. Models like the Perception Outlaw 11.5 at 36 inches wide and Pelican Catch Mode 110 offer outstanding stability that lets photographers move around with camera gear and even stand for elevated shots.
What is the best kayak for all around use?
For all-around use including photography, fishing, and recreation, a 10-12 foot sit-on-top fishing kayak offers the best versatility. These kayaks provide good stability for camera work, enough storage for gear, and reasonable tracking for different water conditions. The Pelican Catch Mode 110 and Lifetime Tamarack Pro 103 provide excellent versatility without being too specialized for any single activity, making them ideal for photographers who also fish or paddle recreationally.
Conclusion
Finding the right kayak for birdwatching and wildlife photography transforms your photography. The silent approach, eye-level perspective, and access to remote locations open creative possibilities that simply do not exist from shore. After testing these kayaks extensively, I am confident the options in this guide cover every photographer’s needs.
For most photographers, the Pelican Catch HDII with its pedal drive system represents the best overall choice. The hands-free operation alone makes it worth the investment for anyone serious about wildlife photography. If budget is a concern, the Pelican Catch Mode 110 delivers excellent stability and features at a more accessible price point. Beginners should start with the Sevylor Quikpak K5 inflatable to test whether kayak photography suits their style before committing to a larger investment.
Whatever kayak you choose, remember that the best wildlife photographs come from patience, practice, and respect for the animals you photograph. The kayak is just the tool that gets you there. Now get out on the water and discover what you have been missing from shore. For destination ideas, check out Hocking Hills photography expeditions for your next adventure in 2026.