

There I was, enjoying the calm waters when I suddenly discovered a kayak hole that needed immediate attention. It’s a common issue among kayakers, and knowing how to fix a kayak hole is essential for anyone who spends time paddling. In this article, I’ll share valuable tips and techniques to help you get back on the water quickly and safely.
When it comes to fixing a hole in your kayak, there are several methods available, depending on the size and location of the damage. Assessing the situation is the first step in ensuring a proper repair, so you can confidently paddle again without fear of sinking. Preparation is key, and having the right tools and materials at hand will make the process smoother and more effective.
From using plastic welding techniques to applying patches, there are numerous ways to address the problem, but not all solutions will be suitable for every type of kayak. In the following sections, you’ll gain a deeper understanding of the different approaches to repairing a kayak hole and determine the best course of action for your specific situation. So, let’s get started – fixing that kayak hole is easier than you might think!
Identifying the Type of Kayak Hole
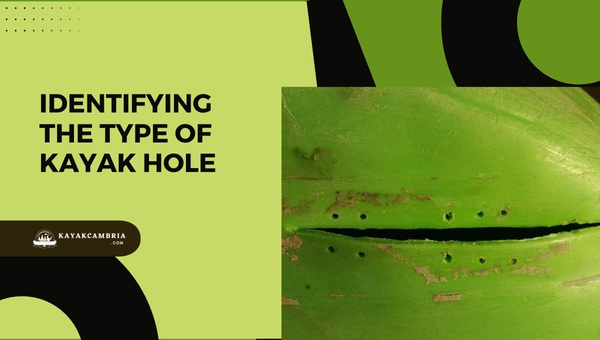
Before diving into how to fix a kayak hole, it’s crucial that I identify the type of hole I’m dealing with. The approach to repairing a hole depends on what kind of hole I’m facing. Generally, there are three main types of kayak holes:
- Abrasions or scratches
- Punctures or small holes
- Cracks or stress fractures
To help determine what kind of hole I have encountered, I’ll carefully inspect my kayak, making note of the following details:
- Does the hole appear as a fine scratch or is it deeper?
- Is the material surrounding the hole thin or frayed?
- Does the damage resemble a piercing or a clean cut?
Let’s take a closer look at each type of hole and its distinct characteristics:
- Abrasions or scratches are usually shallow and are a result of the kayak rubbing against rocks, tree branches, or other abrasive surfaces in the water. They typically don’t require any immediate action and can be easily addressed during a proper cleaning session or general maintenance.
- Punctures or small holes can happen from sharp objects or debris penetrating the kayak’s hull. This type of damage can cause your kayak to take on water, so it is essential to repair it as soon as possible.
- Cracks or stress fractures are more severe, usually stemming from impact, excessive weight, or long-term wear and tear. These usually require more intensive assessments and repairs.
During my investigation, I’ll also need to take into account the kayak’s material. There are two common materials for kayaks, and each has unique repair methods:
- Polyethylene kayaks, which are made of plastic material, are the most common and can be repaired using plastic welding techniques or repair kits.
- Composite kayaks, made of a combination of fiberglass, Kevlar, or carbon fiber, require resin and fiberglass or a specific composite material depending on the kayak construction.
Knowing which material my kayak is made of will guide me in choosing the most effective repair methods and products. Some important tools and materials I will need for repairs include:
- Sandpaper
- Cleaning supplies
- Plastic welding tools (for polyethylene kayaks)
- Resin and fiberglass materials (for composite kayaks)
- Waterproof adhesive or sealant
By accurately identifying the type of kayak hole and understanding the kayak’s construction, I can successfully tackle the repair process, ensuring my kayak remains reliable and safe for future adventures. Next, we’ll dive deeper into the specific repair techniques for each type of hole and kayak material.
Choosing the Right Repair Method

When choosing the right repair method, several factors come into play, including the size of the hole, the material of the kayak, and the tools and materials available to you. I’ll break it down, so you can be confident in making the best decision for your needs.
First, identify the material of your kayak. Here’s a quick rundown of the most common types:
- Polyethylene – The most widely available and least expensive option. Can be harder to repair, but it is durable and resistant to damage.
- ABS / Thermoformed – Somewhere in-between, featuring the durability of polyethylene and the repairability of composites.
- Composite – Lighter and more expensive, but easier to repair than polyethylene.
Next, assess the size and location of the hole. Is it a small crack or a sizeable puncture? Consider your skill level and available time as well:
- Small cracks or scratches – A simple patch job may suffice.
- Medium-sized punctures – Using plastic welding, such as a soldering iron, or patching with appropriate adhesive could do the trick.
- Larger holes – Some reinforcement may be required, so consider using a two-part epoxy with fiberglass or dedicated plastic mesh.
After you’ve identified your kayak’s material and assessed the hole’s characteristics, consider the available repair methods. Here are three common approaches to fixing a kayak hole:
- Patch Kits: Specially designed for various materials, providing an effective and easy-to-use solution to fix small to medium-sized holes.
- Plastic Welding: The use of a soldering iron or commercial plastic welder to melt the materials together can be a highly effective choice for polyethylene kayaks.
- Two-Part Epoxy: A strong adhesive often favored for repairing composite kayaks, but can also be used on various other materials. Ensure that the epoxy you choose is appropriately suited to your kayak’s composition.
Fixing a Hole with Plastic Welding
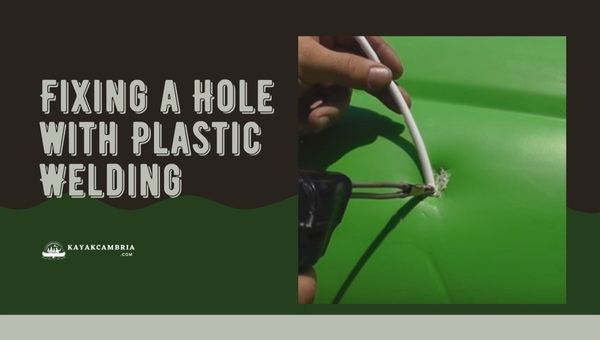
When faced with the challenge of how to fix a kayak hole, one effective method is using plastic welding. I’ll walk you through the process and provide some essential tips for a successful repair job.
Plastic welding is a process that involves heating and melting the kayak material to create a strong, long-lasting bond to repair the hole. Before starting the welding process, ensure you have all necessary equipment and materials, such as a plastic welding kit, compatible plastic material (often from a spare piece of your kayak or a repair patch), and a heat gun.
Here are the steps to follow when fixing a kayak hole with plastic welding:
- Inspect the damage: It’s essential to assess the size and extent of the hole before proceeding with the repair. Simple puncture holes may require minimal effort, whereas larger cracks might need more comprehensive repair work.
- Clean the area: Make sure the kayak’s surface around the hole is clean and free of any dirt, debris, or grease. You can use a mild detergent solution and a soft brush to clean the area and then dry it thoroughly.
- Trim the edges: Trim the rough edges of the hole using a utility knife or sandpaper. This prepares the area for a more seamless and efficient repair.
- Cut the repair patch: Cut a piece of compatible plastic material slightly larger than the hole to cover it completely. You can either use a spare piece from your kayak or obtain a repair patch from a store.
- Heat the patch and the kayak: Using a heat gun, slowly heat the patch and the area around the hole until both surfaces start to melt. Be cautious not to overheat and damage the surrounding areas.
- Fuse the patch: Carefully place the heated patch over the hole and use the plastic welding tool to press and fuse the patch into the kayak. Ensure the patch is evenly and securely bonded to the kayak.
- Cool down: Let the repaired area cool down naturally. Do not use water or any cooling technique, as it may weaken the patch’s bond.
Remember, practice makes perfect, and fixing a kayak hole with plastic welding might require patience and some trial and error. By following these steps, though, you’ll be back on the water in no time!
Patching a Hole with Epoxy Resin
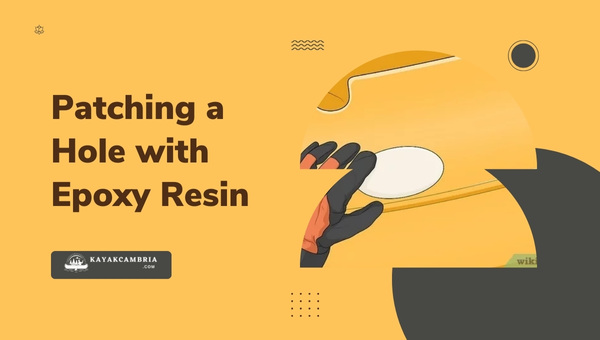
Another effective method at my disposal is using epoxy resin to patch up the damaged area. In this section, I’ll walk you through the process step-by-step.
The first thing I always do is gather all the materials and tools needed for the repair. Here’s a list of essentials:
- Epoxy resin
- Hardener
- Fiberglass or carbon-fiber cloth (if the hole is larger than 1/4 inch)
- Sandpaper (coarse, medium, and fine grit)
- Acetone or rubbing alcohol for cleaning
- Disposable gloves
- Mixing cups and stir sticks
- A heat gun or hair dryer (optional)
Once I have all my materials ready, I follow these steps to patch the hole with epoxy resin:
- Clean the area: It’s important to thoroughly clean the damaged area using acetone or rubbing alcohol. I make sure to remove any dirt, grease, and debris, as they can prevent the epoxy from bonding properly.
- Sand the damaged area: Before applying the epoxy, I sand the damaged area with coarse sandpaper in order to roughen up the surface and help the epoxy adhere better. Then, I wipe away any dust with a clean cloth.
- Mix the epoxy: Following the manufacturer’s instructions, I mix the epoxy resin with the hardener in the correct ratio using a disposable cup and a stir stick.
- Apply the epoxy: If the hole is smaller than 1/4 inch, I apply the epoxy directly onto the sanded area, making sure it fills the hole completely. For larger holes, I cut a piece of fiberglass or carbon-fiber cloth to size and saturate it with the epoxy mixture before placing it over the hole.
- Press down firmly: When applying the epoxy or the cloth, I use my gloved fingers or a flat tool to press down firmly, ensuring good contact between the kayak surface and the patch.
- Allow the epoxy to cure: The curing time for epoxy can vary, so I always check the manufacturer’s instructions to determine the appropriate wait time. If desired, I use a heat gun or a hairdryer to help speed up the curing process.
- Sand the patched area: Once the epoxy has completely cured, I sand the area with medium grit sandpaper to smooth any rough edges, and I finish with fine grit sandpaper for a smooth surface.
- Clean and inspect: Lastly, I clean the area once more with acetone or rubbing alcohol and inspect the patch to ensure it is sturdy and well-bonded to the kayak.
By following these steps, I can effectively fix a kayak hole using epoxy resin and restore my kayak to its former glory.
Conclusion
Fixing a kayak hole is crucial to ensuring your water adventures remain safe and enjoyable. While it may seem intimidating at first, following the right steps makes the process more manageable. I’ve gathered practical tips and tricks that will assist you in addressing this issue with confidence.
Initially, it’s essential to identify the type of kayak material you have, as different materials require specific repair techniques. For instance:
- Polyethylene kayaks: Require a plastic welding kit
- Composite kayaks: Need patching with fiberglass or carbon fiber, along with epoxy resin
- Inflatable kayaks: Utilize a specialized repair kit with patches and glue
Next, ensure you have the necessary tools and materials on hand before you begin the repair process. I suggest assembling the following:
- Repair kit or patch material
- Sandpaper
- A heat source (if required)
- Protective gloves
- Brush or roller (for applying resin)
Remember, preparation is key to a successful repair. So, take time to clean and dry the damaged area thoroughly before commencing. Sanding the surrounding surface will also help create a strong bond.
Once you’ve prepped the kayak, you can proceed to fix the hole based on your kayak’s specific material requirements. Polyethylene kayaks will need plastic welding, composite ones require patching with epoxy resin, and inflatable kayaks need specialized glue and patches.
Lastly, after completing the repair, always allow enough time for the resin, glue, or welded plastic to cure. Don’t rush this step, as it’s essential to guarantee the effectiveness of your repair long-term.
By following these guidelines on how to fix a kayak hole, you’ll have your vessel seaworthy once more in no time. Knowing these tips empowers you to prevent small damages from escalating into more significant issues, thereby extending your kayak’s lifespan and optimizing your aquatic explorations.